Tại Việt Nam chưa có ai mổ xẻ pin của xe Tesla xem ruột gan ra sao, chúng ta theo dõi đội phẫu thuật nước ngoài mổ xẻ xem thế nào.
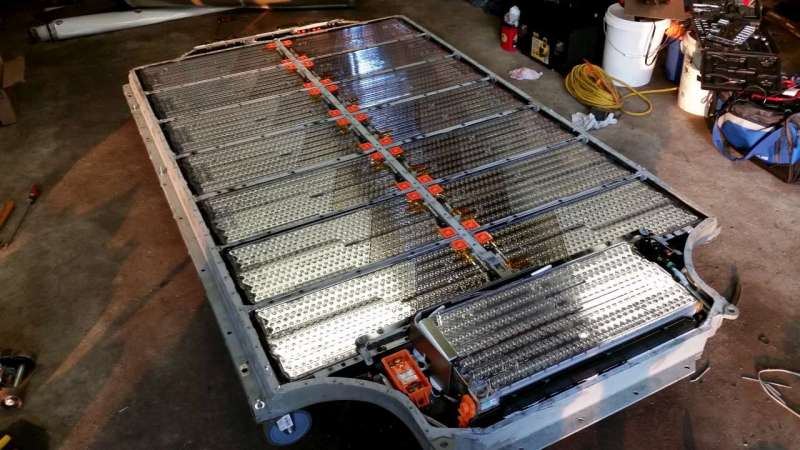
Đây là một bộ pin của Tesla Model S bị tai nạn, được một "phẫu thuật viên" mua về để mổ.

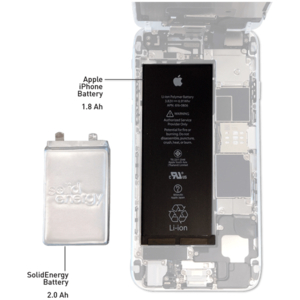
Bộ pin này gồm 7000 viên cell pin lithium-ion chia thành 16 module. Công suất định mức là 85 kWh tại 400VDC.
Pack right after it came off of the truck. (Yes, I bolted some wheels to it)

85 kWh "D" Pack

Plastic cover which I later discover has the pack main fuse under it.

Label on the center of the pack.

Top view of the high voltage connector

Pack after removing the plastic cover which what appears to be some type of fireproofing material under it (between the plastic and pack).
The two dents were where some hooks on chains were when the pack was being lowered to the ground by the transport truck. The actual modules are further down under this piece and not affected.

Removed all screws from the top of the pack and starting to peel away the top cover. The thing is held on with so much adhesive/sealant that it took us nearly 40 minutes to get to this point.

Making progress opening the pack, first couple of modules now visible. I popped a few of the orange HV caps from the one module because I was anxious to get an idea of the pack voltage and module voltage since the pack had been sitting for a while.

Top view of the one module.

Put a volt meter on the hot side of the main contactors to read the full pack voltage. 313.8V. So, not toast but definitely dead. (No comments about my cavalier method for testing this please, I know what I'm doing... most of the time)

Module voltage.

Close up of the pack's main fuse.

Got the security screws out of the front portion of the pack and removed the metal cover finally, revealing the two front modules which are stacked.

View of the front two modules showing the coolant loop quick disconnects. Those are spring loaded and the coolant actually seems to be under pressure. I may work on a way to connect to that to hook up a small radiator and pump later.

Pack with the entire top cover removed safely, over 2 hours after starting. (Yes, I bolted some wheels to the sides of the pack, and they work...)

Close up of some of the cell level fusing. Awesome safety feature here.

Another shot of the coolant loop connections and front modules.

View of most of the pack.

Main contactors. One is for positive and one is for negative. They are connected with bus bars to the pack and to the external connector. There are also small leads (visible on the top) from both sides of the contactors that go to what I would call the main BMS board.

View of part of the high voltage bus bars.

External low voltage connectors, presumable for BMS communication and pack control.

Close up view of the external HV connector showing part of the actual connection that makes contact with the large male blade connector on the car. This configuration would likely have very low resistance since it would make uniform contact across the entire connection.
Update #1:

Close up of some more cells showing the cell level fuses and the inversion of the next group of cells.

Pack's main fuse, removed.

One of the pack's contactors. This one is for the negative terminal. The other is for the positive terminal (not shown) and is a different part number.

Bottom of the negative contactor showing manufacture as "Tyco Electronics."

Tesla's part number label for the negative side contactor.
Update #2:

Front of BMS Module board (one of these on each of the 16 modules)

Back of the BMS Module board.